
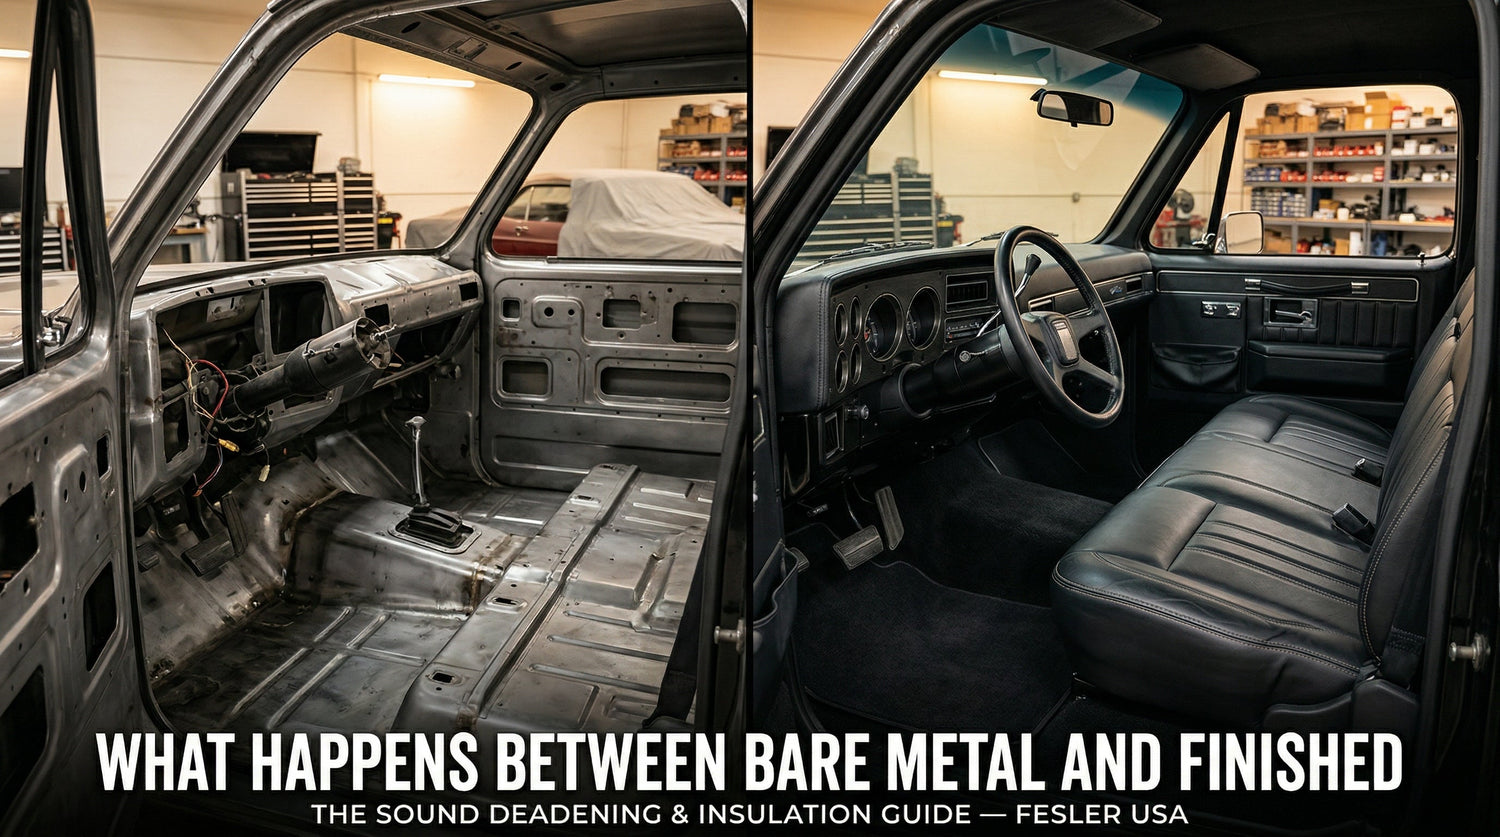
Sound deadening is the layer nobody sees and everybody notices. It is the difference between a classic truck or muscle car that feels like a finished vehicle and one that feels like a loud, hot project. When it is done right, you hear your stereo clearly at highway speed, your feet do not cook over the transmission tunnel, and the interior panels stay rattle-free for years. When it is skipped or done wrong, you are stuck with a noisy, hot cabin and no good way to fix it without pulling everything back out.
This guide covers the products that actually work, where to apply them on the most popular classic platforms, how they interact with Fesler carpet kits and interior panels, and exactly when in the build sequence to do the work. If you are building a Chevy C10, Squarebody, Camaro, Chevelle, Nova, Mustang, Bronco, or OBS truck and planning to install carpet, door panels, or a headliner, this is the step that needs to happen first.
Why Classic Cars and Trucks Need Sound Deadening
Classic vehicles were not engineered with modern insulation. Most left the factory with thin asphalt-based pads on the firewall and little else. Some had jute padding under the carpet. Many had nothing at all. The result is a cabin that amplifies every noise from the drivetrain, exhaust, road surface, and wind.
Modern builds make this worse, not better. An LS swap with headers and a 3-inch exhaust puts out significantly more heat and noise than a stock small block with cast manifolds. Bigger tires, lowered suspensions, and deleted inner fenders all increase what reaches the cabin. Flush-mount glass actually helps here because the urethane bond creates a tighter seal than factory rubber weatherstrip, but the glass alone cannot compensate for an untreated floor and firewall.
Sound deadening addresses three problems at once: vibration (panel resonance from the engine and road), airborne noise (exhaust drone, tire roar, wind), and heat transfer (engine and exhaust heat radiating through sheet metal into the cabin). Each problem requires a different material, and the best results come from layering them in the right order.
Do I really need sound deadening in a classic car or truck?
If you plan to drive the vehicle on the street, yes. Sound deadening reduces cabin noise by 10 to 15 decibels in most classic builds, which is roughly the difference between shouting over road noise and having a normal conversation at highway speed. It also blocks a significant amount of radiant heat from the engine, exhaust, and floor pan. In hot climates like Phoenix, where Fesler builds are based, untreated sheet metal can make the cabin unbearable even with air conditioning. For show-only vehicles that never turn a wheel on pavement, it matters less. For everything else, it is a foundational step.
The Three Layers: What Each Product Does
Sound deadening is not one product. It is a system of layers, and each layer handles a different type of noise and heat. Here is what they are and what they do:
What is the difference between sound deadening mat, closed-cell foam, and mass loaded vinyl?
Layer 1: Constrained Layer Damper (CLD) — Butyl Deadening Mat
This is the peel-and-stick mat that goes directly on bare sheet metal. It is a layer of butyl rubber bonded to an aluminum foil backing. When pressed flat against sheet metal with a roller, it converts panel vibration into a tiny amount of heat, effectively killing the "tinny" resonance that makes classic car floors, doors, and roofs act like speakers. You test it by tapping the panel with your knuckle before and after. Before: a ringing "tink." After: a dead "thud."
The major brands are Dynamat Xtreme, HushMat Ultra, Kilmat, FatMat, Noico, and Second Skin Damplifier. They all use the same basic butyl-and-foil construction. The differences come down to thickness (measured in mils), adhesion quality, and price per square foot. For classic car and truck builds, 50 to 80 mil thickness is the standard recommendation. Thinner products save weight but dampen less. Thicker products dampen more but add weight and can interfere with panel fitment.
Important: Butyl is the material that matters. Older asphalt-based deadeners (the black, tar-like pads found in many factory cars) can dry out, crack, and smell in heat. Modern butyl mats do not have this problem. If you are stripping an old interior and find crumbling black pads on the floor, scrape them out and replace with butyl.
Layer 2: Closed-Cell Foam (CCF) — Thermal and Acoustic Insulation
Closed-cell foam is a lightweight insulation layer that goes on top of the butyl mat. It provides thermal insulation (blocking radiant heat from reaching the cabin) and absorbs mid-to-high frequency sound. Products include Dynamat Dynaliner, HushMat Silencer Megabond, Second Skin Luxury Liner Pro, and FatMat RattleTrap. Typical thickness is 1/8 to 1/4 inch.
Foam alone does not stop vibration. It sits on top of the CLD layer and adds a second barrier. The combination of butyl mat plus closed-cell foam is what most builders use on the floor, firewall, and transmission tunnel. In hot climates, this layer is especially valuable on the firewall and floor because it blocks heat transfer that butyl alone does not fully address.
Layer 3: Mass Loaded Vinyl (MLV) — Sound Barrier
MLV is a heavy, flexible sheet that blocks airborne sound from passing through panels. It is the most effective single product for reducing road noise and exhaust drone, but it is also the heaviest and most expensive layer. Products include Second Skin Luxury Liner, Dynamat SuperLite, and various generic 1 lb/sqft MLV rolls.
MLV is not required for every build. If you are doing a weekend cruiser or show car that sees limited highway miles, butyl mat plus foam plus a mass-backed carpet kit will get you most of the way there. If you are building a pro-touring truck or muscle car that racks up real road miles, especially with a loud exhaust, MLV on the firewall and floor makes a noticeable difference on top of the other two layers.
Where to Apply Sound Deadening: Priority Zones by Platform
You do not need to cover 100% of every surface. Strategic placement in the right zones gets 80% of the benefit. Here are the priority areas ranked by impact, with notes specific to the classic platforms Fesler serves.
Where should I put sound deadening in a C10 or Squarebody?
1. Firewall (highest priority). The firewall is the biggest noise and heat transmitter in every classic truck. It is a flat sheet of metal between the engine and your feet. In a 1967–1972 C10 or 1973–1987 Squarebody, the firewall surface area is large and directly exposed to engine heat, header radiation, and mechanical noise. Cover 80 to 100% of the interior firewall surface with butyl mat, then add closed-cell foam on top. If you are running headers or a high-output engine, consider MLV as a third layer on the firewall.
2. Floor pan and transmission tunnel. Road noise and exhaust heat come through the floor. The transmission tunnel is particularly bad because it is close to the exhaust and often has thin metal. Cover the full floor and tunnel with butyl mat. Add foam on the tunnel and high-heat areas. This is the surface your Fesler carpet kit sits on, so getting this layer right directly affects how the carpet feels and sounds underfoot.
3. Doors. Doors are hollow, resonant chambers. Treating the outer door skin with butyl mat (4 to 6 patches on the flat areas) kills panel vibration and dramatically improves speaker performance if you are running speakers in your Fesler kick panels or Fesler door panels. The inner door skin also benefits from a few patches to reduce rattle behind the door panel.
4. Roof. The roof is a large flat panel that resonates in rain and at highway speed. Butyl mat patches across the flat sections of the roof reduce this. If you are running a Fesler one-piece fiberglass headliner, the headliner itself adds a rigid barrier between the roof and the cabin, but treating the roof metal before the headliner goes in gives you the best result.
5. Rear wall (cab trucks). Behind the seat on standard cab trucks. Sound from the bed, exhaust, and rear axle enters here. Butyl mat on the flat areas plus foam makes a solid improvement.
Where should I put sound deadening in a Camaro, Chevelle, or Nova?
The same priority order applies: firewall first, then floor and tunnel, then doors, then roof, then trunk/rear deck. Muscle cars have an advantage over trucks because the cabin is smaller, so you need less material. A first-gen Camaro or Nova can be fully treated with 60 to 80 square feet of butyl mat. A Chevelle or second-gen Camaro may need 70 to 90 square feet. The trunk floor and rear wheel wells are worth treating if you have a loud exhaust, because sound enters the cabin through the rear deck and quarter panels.
How much sound deadening material do I need?
As a general guide for the platforms Fesler serves:
1967–1972 C10 standard cab: 80 to 100 square feet. 1973–1987 Squarebody standard cab: 80 to 100 square feet. 1967–1969 Camaro: 60 to 80 square feet. 1970–1981 Camaro: 70 to 90 square feet. 1966–1972 Chevelle: 70 to 90 square feet. 1966–1972 Nova: 60 to 80 square feet. 1988–2000 OBS truck standard cab: 80 to 100 square feet. 1966–1976 Bronco: 60 to 80 square feet. 1964.5–1970 Mustang: 60 to 80 square feet.
These estimates assume 60 to 80% coverage of the priority zones, not 100% wall-to-wall coverage. If you want full coverage including the roof, trunk, and every surface of every door, add 30 to 50% more material.
How Sound Deadening Connects to Fesler Interior Parts
Sound deadening is the foundation layer. Everything Fesler makes for the interior sits on top of it. Here is how the layers work together:
Should I use Standard or Mass Back carpet?
Every Fesler carpet kit is available in Standard or Mass Back backing. Standard is a lighter weight option that feels close to OEM. Mass Back adds a dense rubberized layer bonded to the underside of the carpet that provides additional sound and heat insulation built right into the carpet itself.
If you have already applied butyl mat and foam to the floor, Standard backing is a perfectly good choice. The dedicated sound deadening layer is doing the heavy lifting. If you want maximum noise and heat reduction, or if you are skipping the dedicated floor treatment and want some insulation built into the carpet, Mass Back is the way to go. For pro-touring and highway-driven builds, the best setup is butyl mat on the floor, foam on top of that, and Mass Back carpet as the final layer. That three-layer stack is what gives a classic truck or muscle car a cabin that feels modern.
Fesler carpet kits are available for the 1967–1972 C10, 1973–1987 Squarebody, 1973–1991 Squarebody Suburban, 1967–1969 Camaro, 1970–1974 Camaro, 1975–1981 Camaro, 1964–1977 Chevelle and El Camino, 1988–1998 OBS pickup, 1992–1999 OBS SUV (Tahoe, Suburban, Yukon), 1964.5–1970 Mustang, and more. All are made in the USA by Auto Custom Carpets (ACC) and offered through Fesler.
Does sound deadening affect Fesler door panel fitment?
Not if applied correctly. Fesler fiberglass door panels are designed to clear factory door skins with standard-thickness butyl mat (50 to 80 mil) applied to the outer door skin. Do not stack multiple thick layers on the inner door skin where the panel mounts, or the panel may not seat flush. Apply butyl to the outer skin (the side facing the outside of the vehicle) and use only a thin layer or small patches on the inner skin to avoid fitment interference. The same applies to kick panels. Keep the mounting area clear.
Should I treat the roof before installing a Fesler headliner?
Yes. The Fesler one-piece fiberglass headliner (available for the 1967–1972 C10 and 1973–1987 Squarebody, as well as the 1967–1969 Camaro) adds a rigid barrier between the roof and the cabin. But the roof metal itself still resonates. Applying butyl mat patches to the flat sections of the roof before the headliner is installed gives the best acoustic result. Think of it this way: the deadener kills the vibration, and the headliner blocks whatever is left. Doing both is how you get a cabin that is quiet in rain and at highway speed.
Does flush-mount glass help with cabin noise?
Yes. Fesler flush-mount glass bonds to the body with high-strength automotive urethane, which creates a tighter, more complete seal than factory rubber weatherstrip. This eliminates the wind whistle that is common on classic cars with aged rubber seals and adds structural rigidity to the body. The urethane bond and the glass itself become part of the cabin's noise barrier. Combined with treated floors, doors, and roof, flush-mount glass is the final piece of a truly quiet classic build. For a deeper breakdown of flush vs factory glass, read our flush-mount vs stock glass guide.
The Right Build Sequence for Sound Deadening
Sound deadening goes in after metalwork and paint, but before everything else in the interior. Here is where it fits in the full build sequence:
Step 1: Bodywork, rust repair, and paint. The metal must be clean, dry, and finished before any deadening material is applied. Butyl mat adheres to clean, bare or painted metal. It does not stick well to rust, oil, or primer dust.
Step 2: Glass. Whether you are installing Fesler flush-mount glass or OEM replacement glass, do it before the interior goes in. The glass position determines where the headliner, A-pillars, and upper panels land.
Step 3: Sound deadening. With the cabin stripped and the glass in, this is the moment. Apply butyl mat to the firewall, floor, tunnel, doors, roof, and rear wall. Then add closed-cell foam to the firewall and tunnel. Let the butyl cure and fully adhere before moving on. The surface should be clean, dry, and between 60 and 90 degrees for best adhesion. Use a wooden or hard rubber roller to press every square inch flat. Air pockets reduce effectiveness and can cause the mat to lift over time.
Step 4: Wiring and HVAC. Route harnesses and HVAC ducting on top of the deadened surfaces. The deadening layer is now the "floor" that everything else references.
Step 5: Headliner and upper panels. The Fesler headliner, A-pillars, and rear upper panels go in over the treated roof.
Step 6: Dash, door panels, and kick panels. Fesler fiberglass interior panels mount over the treated surfaces. Doors should already have butyl on the outer skin before panels are installed.
Step 7: Carpet. Fesler carpet kits lay down on top of the treated floor. If you want jute padding between the deadener and the carpet, this is where it goes. Mass Back carpet already has padding built in, so additional jute is optional with that backing choice.
Step 8: Seats and trim. Last in, first to be enjoyed.
For a more detailed build sequence with product-specific links for every step, read our Squarebody upgrade guide or our 2026 build order guide.
Common Mistakes to Avoid
Can I just use mass-backed carpet and skip the dedicated sound deadening?
You can, and it will help. Mass Back carpet is better than Standard backing with no deadener underneath. But it is not a substitute for a proper butyl and foam treatment on the floor. Mass Back handles mid-frequency noise and some heat, but it does not kill panel vibration the way a bonded butyl mat does. The best result is both: dedicated butyl and foam on the metal, then Mass Back carpet on top. If budget forces you to pick one, start with butyl on the firewall and floor (the two highest-impact areas) and use Mass Back carpet over it. You can always add more deadening later, but only if you are willing to pull the carpet back out.
What about spray-on sound deadening like Lizard Skin?
Spray-on products (Lizard Skin Ceramic Insulation, Lizard Skin Sound Control, and similar) work well for areas that are hard to reach with sheet material, like inside door cavities, behind body panels, and inside quarter panels. Some builders spray the entire cabin and get good results. The trade-off is that spray-on products require more prep, more coats for full effectiveness, and a spray gun. They are harder to remove if you ever need to access the metal underneath. For most builders, peel-and-stick butyl mat on the main surfaces plus spray-on in the hard-to-reach areas is the practical balance.
Does sound deadening add a lot of weight?
Yes, but less than you might think. A full treatment of butyl mat on a standard cab truck (80 to 100 square feet of 50-mil material) adds roughly 35 to 50 pounds. Closed-cell foam adds very little weight. MLV adds the most weight per square foot. For a street-driven build, the comfort and noise improvement is worth the weight. For a dedicated race car, skip it. For everything in between, treat the firewall and floor at minimum and decide from there.
Can I apply sound deadening over old factory insulation?
No. Strip the old material completely. Factory asphalt pads trap moisture against the metal and cause hidden rust. Old jute padding holds water like a sponge. Remove everything down to clean, dry metal before applying modern butyl mat. This is also the time to address any rust underneath. If you apply deadener over rust, you are sealing in a problem that will get worse.
How It All Comes Together
Sound deadening is not a standalone upgrade. It is the invisible foundation that makes every visible upgrade work better. Your Fesler fiberglass interior panels look the same whether the metal behind them is treated or not, but they feel completely different. The cabin is quieter, cooler, and more solid. Your speakers sound better because the door skins are not vibrating. Your carpet feels more substantial because it is sitting on a proper layered floor. Your headliner is not amplifying every raindrop.
This is the layer that separates a build that looks finished from one that feels finished.
Browse all Fesler interior parts and Fesler carpet kits, or contact us to plan your build. Call or text 480-748-2000, Monday through Thursday, 8am to 5pm MST.
Follow @feslerusa on Instagram to see builds, interiors, and glass installs from the shop every week.
Related Reading
1973–1987 Squarebody Upgrade Guide: Flush-Mount Glass, Interior Kits, and the Right Build Sequence
Fesler Carpet Kits: Complete Guide for C10, Camaro, Chevelle, Nova, Mustang, OBS Trucks and More
Interior Materials Guide: Vinyl vs Leather vs Alcantara (Builder-Proven Picks That Hold Up)
Interior First: The "Feels Finished" Upgrade Path for Classic Builds
Which Glass Option Is Right for Your Classic Build? Fesler Flush Mount vs Stock Glass
The 2026 Build Order: What To Buy First (So You Don't Pay Twice)
Dash Planning 101: How to Get a Tesla-Clean Dash in a Classic (Without Regret)


Leave a comment
This site is protected by hCaptcha and the hCaptcha Privacy Policy and Terms of Service apply.